Jay Fisher - Fine Custom Knives
New to the website? Start Here
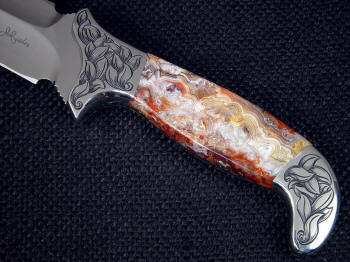
"Kotori"
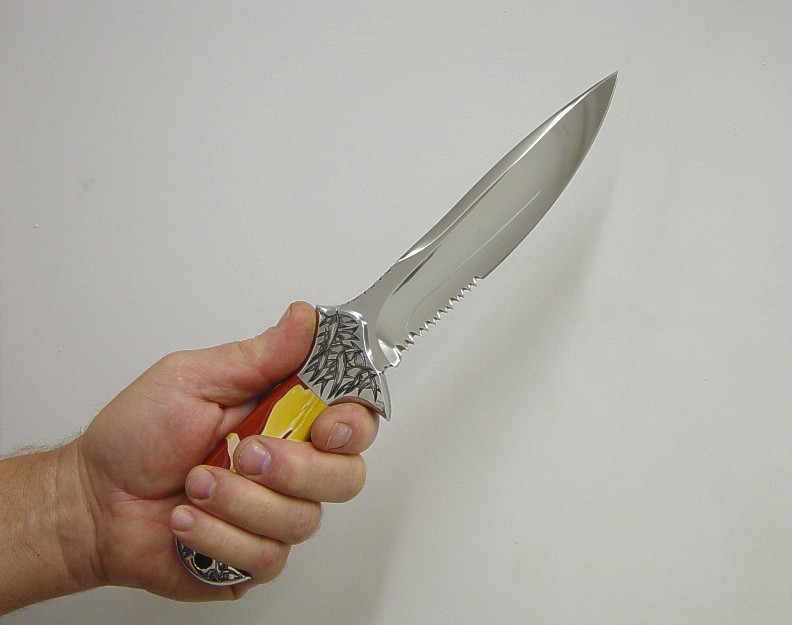
I freaking love you man, I don't know if you're even alive given that your website looks ancient, but I came across your Knife Grip page while I was doing some research for a fight scene I'm writing out, and your educational pictures made things so much easier to understand than what I found on Wikipedia. I don't really want to buy a knife, but thank you for the educational images.
--Adam
This page details grip and handling of knives, with particular emphasis on tactical, combat, and defensive knives to help the knife professional understand combat and tactical knife features described and detailed on this website. The pictures will help to illustrate the techniques of holding or gripping a knife with the hand that are typical for this type of knife. I've included a hand sizing technique that is useful on large quillon knives to fit the individual hand to the knife.
A knife is a simple tool and in the hands of a trained professional, a devastating weapon. Unlike a firearm, the knife can not be made safe or non-functional as it is a simple form. Even if the cutting edge is dulled, the point can still be dangerous. Bare human tissue is powerless against the sharp cutting edge of steel, and being pierced by a knife can be fatal. Not only can the knife be dangerous to the opponent or enemy, but to the person who wields it.
What makes a knife a weapon and not a tool? After all, both have cutting edges, points, and handles. The reality is that there is no defining list of features or specifications that can define what is a knife weapon from a knife tool. If there were, the cutting implements that have those features would be tightly controlled. It's probably enough to know that most non-combat knife attacks and deaths are attributed to kitchen knives simply because they are common and easily accessible.
Knives and politics are a heated affair, and are certain to get worse. Promoting knives as weapons to the masses is a slippery slope, and I do not suggest any knife be carried and used as a weapon except by trained professionals; the same professionals who can and do carry a firearm in their occupation. Thankfully, our country allows us the freedom to own knives for many purposes, including weapons. Sadly, this is not the case in other countries who have allowed their governments and fears to whittle away their freedoms:
"Let us be clear, if you carry a knife our objective and
determination is that you will be prosecuted; you will be punished...but
we want to do all in our power also to prevent anyone carrying a knife
in the first place.
Enforcement, punishment and prevention together!"
Rt. Hon Gordon Brown MP, Prime Minister of Great Britain...July, 2008
The topics on this page and on the military, tactical, and combat knife pages of this site are directed toward the knife professional, whether he is a soldier headed for combat, a law enforcement officer, or an instructor or collector of this type of knife. The descriptions should help all knife owners and users, to better understand how the knife is gripped, why it's held in a particular way, what features on the knife are included to aid gripping techniques, and what to look for in specific knife design. There is also a section on hand-sizing the knife to fit your hand if you're purchasing a custom handmade knife from me.
"Any serious knife combatant or collector who hasn't experienced Jay's quality really doesn't know how good a knife can be. It's beyond precision, the finest materials, or even art. Jay has a quality that is unique in the world: a sense for perfection in application, as well as beauty. When you feel the balance, you'll never want to go back to any other, but when you see the look, you'll want to put it in a jewel case! What a great conundrum."
--Tom and Joe, your Blade Combat team.
Knives may be gripped in several ways, but two main distinctive techniques have evolved in the tactical knife field along with some unusual grip techniques. They are all very different, and each has distinct advantages and disadvantages. On the military, tactical combat knives pages available through my tactical knife portal, you will see the knives photographed with details mentioning the grip techniques. The predominant grip technique is the forward or traditional, and one that is used when first picking up most knives, and is the way one would hold a kitchen knife.
There is no proper or correct way to hold a knife. The human hand has amazing ability to accommodate a wide variety of positions and holds, and since every person is different, many grip techniques are used.
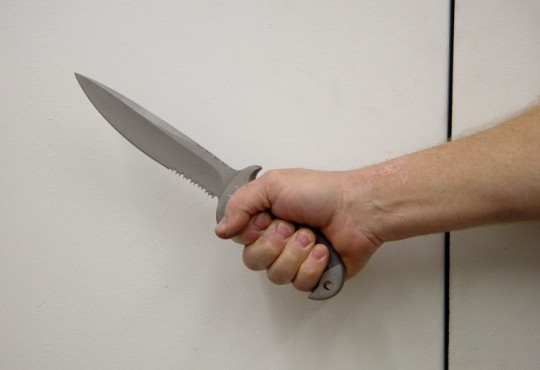
A grip is considered forward when the blade opposes the little finger. The Hammer grip, also called forward and saksak*,, this is the predominant grip technique. The fingers are wrapped around and under the belly of the handle, and the thumb is wrapped around the handle and in contact with the forefinger. The knife assumes a blade point angled up position when the wrist is locked and square.
The traditional grip technique's main advantage is reach and some say finesse. The knife blade is held away from the body, and with an extended arm can deliver slashing cuts at the greatest distance. Because it is traditional, it feels the most comfortable to most people. It is the way most knife and other tool handles are oriented, and lends itself best to cutting and sawing chores in front of the knife owner. Because of the location, the knife and its work (or enemy) are easy to see. Notice that the knife is always at an up point angle, because of the natural orientation of the wrist.
The disadvantages are that the knife is far away from the body, therefore the hand is vulnerable and easily trapped or injured by an opponent or enemy. Also, less force can be applied the farther the hand is from the body and the more the arm is extended. The wrist must usually be canted (tilted) forward for the blade to remain straight or horizontal and aimed at the enemy. This can be unnatural and hard on the joints at the wrist, preventing the knife user from locking his wrists such as in a square-fisted punch. Enemies behind and beside may be hard to reach with the blade. Locking the wrist square in a punching position directs the knife point straight up or toward the user, not the opponent, particularly since the elbow folds inward, and can bringing the knife point directly into the knife user's head and chest area.
*Saksak - Visayan dialect of the Philippines meaning "to stab"
The knife shown is my Principal Security Detail knife, "Macha" in bead blasted 440C high chromium martensitic stainless steel, machine-engraved 304 stainless steel bolsters, and micarta phenolic handle material.
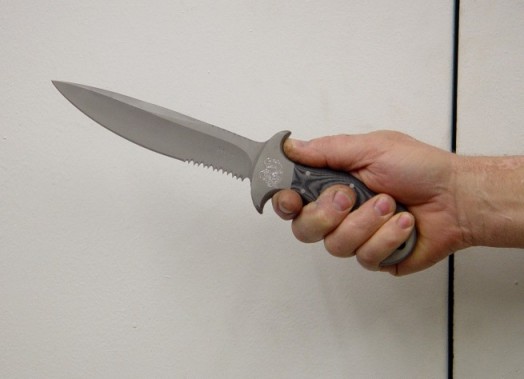
A grip is considered forward when the blade opposes the little finger. Another variation of the traditional forward grip technique is the Saber; to have the thumb on top of the spine of the knife, or at the quillon or thumb rise. The saber grip will allow the hand to apply pressure with the thumb, which is very strong in the human hand. For a clear illustration of this, look at the amount of muscle at the base of the thumb in the photo on the left. In cutting chores, rather than tactical or combat use, this position allows good control and reach. In tactical use, it has similar advantages as the hammer (above).
The obvious disadvantage of this gripping technique is that the hand has a noticeable opening between the thumb and the forefinger and middle finger, so the grip is not as certain and secure as it would be if the hand was completely closed. It can help somewhat if the handle shape, like the one shown, has substantial front and rear quillons to help secure the hand in the knife handle. Note that in this knife handle design, the downward curvature of the butt of the handle avoids sharp angles and digging into the palm of the hand when force is applied to the knife in a thrust. This is a problem with a lot of designs; though the knife might look cool with a squared-off butt and be cheaper to manufacture and purchase, it is not accommodating to the human hand which is a study of complex curves and numerous muscles and joints, none of them square or straight.
The knife shown is my Principal Security Detail knife, "Macha" in bead blasted 440C high chromium martensitic stainless steel, machine-engraved 304 stainless steel bolsters, and Micarta® phenolic handle material.
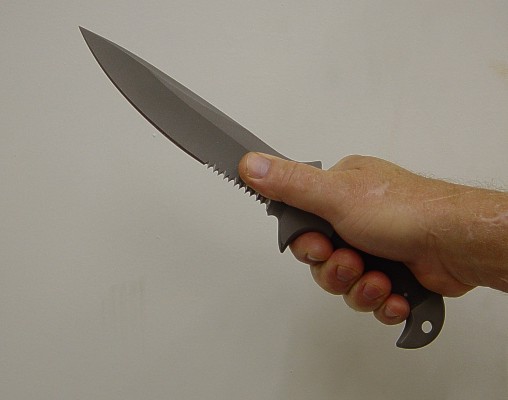
A grip is considered forward when the blade opposes the little finger. The modified saber grip technique is the same as a hammer grip, but in the modified saber grip, the thumb is placed on the side of the blade. The advantage here is the same as the hammer, in that the grip is very strong, and it is stronger than the traditional saber grip technique as more of the hand (the thumb) is actually wrapped around the knife generally. The modified saber grip also forces the hand to naturally orient the knife in a horizontal or slashing position if the hand is held in traditional square-fist orientation: the strongest, locked wrist punching position of martial arts.
The disadvantages to this technique of knife grip tactic are several. The thumb is positioned on the side of the blade, precariously near the cutting edges. Note in the photo at the left the location of the pad of the thumb and the sharp serrations on my Macha Navigator CQB and CQC knife. A few jostles of the hand and the thumb could slide down to the serrations (or cutting edge in other models) and be badly injured by the user's own knife. I've seen photos where this problem is handled by moving the thumb down to the side of the handle to keep the thumb out of the way of the cutting edges, but in order to do that, the handle must be very long, or the handle moved up into the hand where not as much control will be available. Another disadvantage is that cutting outward can not happen in this grip technique unless the knife is double edged, and even then, the musculature of the human arm has limited strength in a backhand motion unless the knife user is a well-trained tennis player!
The knife shown here is my Macha Navigator combat knife pattern in bead blasted 440C high chromium stainless steel, with stainless steel bolsters and micarta phenolic handle.
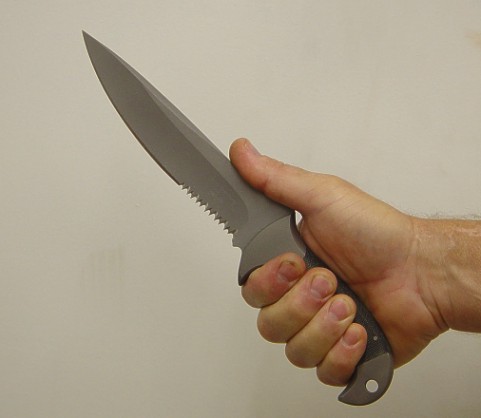
A grip is considered forward when the blade opposes the little finger. The Filipino grip is a forward grip technique where he thumb is not wrapped around the knife handle, like the hammer grip or along the back of the handle like the saber grip or along the side of the blade like the modified saber grip, but along the spine of the knife back. The idea is that the thumb guides, aims, and applies pressure to the spine of the knife, thus is able to increase pressure at the point of the knife blade. In effect, the blade can serve as an extension of the thumb, and for some it seems more natural.
The problems are several with this type of grip technique. First, it is probably better served on a small knife where the thumb extension feeling and association is more compact and reasonable. On a smaller knife, it can be a more comfortable and secure grip technique, but on a larger, heavier, and longer-bladed combat tactical knife, the thumb on spine is unwieldy and even uncomfortable. This is because it is unnatural for the thumb to be hyper-extended in a thumbs-up position, and the extension can mean that the thumb itself and its musculature and tendons are not protected and are subject to injury. Imagine a heavy strike applied to the main cutting edge of the knife in the photo. The thumb would be forced back toward the wrist, straining it. There is a reason that most martial arts systems teach a locked-wrist technique of impacts, and that is to protect this complicated wrist-hand-thumb joint. The second issue is that with the thumb extended, the motion of the forearm is more restricted. If you don't believe this try this simple exercise: with your hand closed in a fist, extend and rotate your right hand counterclockwise, until your thumb is on the outside of your body axis. The rotation is unencumbered in most people, and the rotation can continue all the way to the shoulder. Now try the same movement with your thumb extended such as in this grip. You might be surprised to discover that your rotational movement is significantly restricted! The same limitations occur in an opposite rotation with the elbow being forced to fold against the body to achieve the same rotational degree. The fact holds that with the thumb extended, motion is restricted and the thumb is more vulnerable.
I'm not claiming that this grip technique does not have its place, on small knives in close quarters combat. But for larger knives, it's probably not the best grip technique.
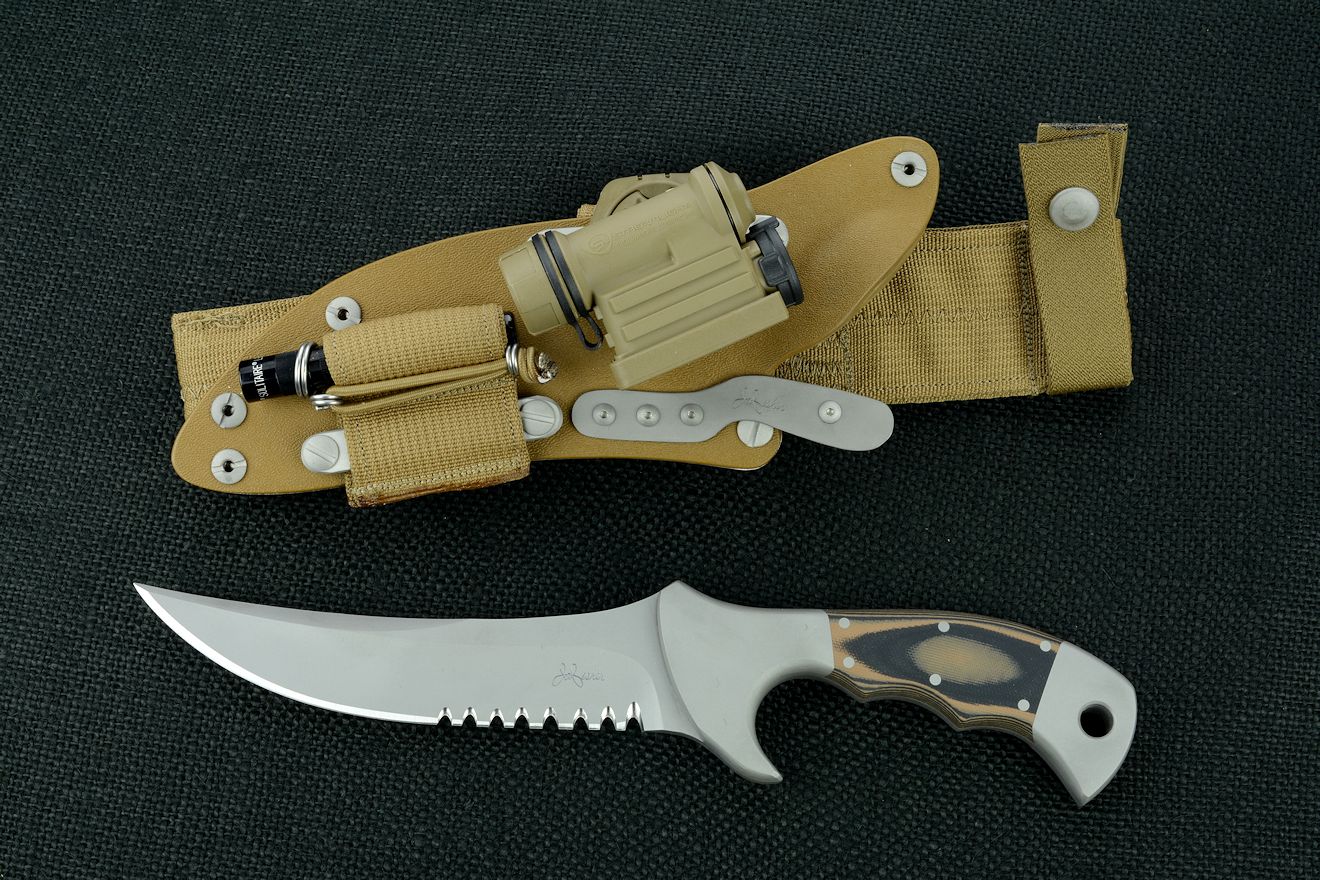
The reverse knife grip technique occurs when the knife blade and point oppose the thumb; the direction is opposite of the forward grip. Also called Icepick (WW2 era), stabbing (colloquial), reverse grip techniques have got a lot of attention over human time, not all of it good. It's funny to note that in the past decades, the reverse grip was considered a sign of a novice, popularized by knife murder dramas where an inexperienced attacker would grab a knife and poke wildly downward. People trained in the elegant and proper use of swords and parrying daggers traditionally used the forward grip, so to them, this was the only refined way to hold an edged weapon. Since refined is proper, all other grip techniques must be improper.
The elegant, proper, and distinguished methodology of fighting for your life has, thankfully, passed. If you are in CQB, there are no rules, no restrictions, and no limitations to your methods you might use to save your very life. If reverse grip techniques work for you, use them. Like the other grip techniques, they have their distinctive types, advantages, and disadvantages.
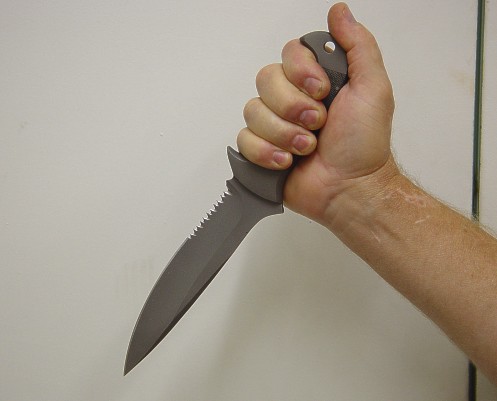
A grip is considered reversed when the blade opposes the thumb. The reverse grip then positions the blade pointing downward in the locked fist position. Edge out means the cutting edge of a single-edged knife is oriented away from the body. This is a traditional reverse grip, because the handle orientation of most knives can accommodate either the traditional forward grip or reverse grip with the palm of the hand in the same location on the handle, along the spine. So, of the reverse grip techniques, this is the most frequently accommodated and the most comfortable for most knife handles.
The advantages to the Reverse Edge Out grip technique are many. First, unless the elbow is extended and locked straight, the blade cutting edge always faces the enemy, no matter where the hand is located (unless it's behind the knife user!). When the fist moves as in a cross punch, the blade and cutting edge can be raked across the enemy in a slashing motion. Second, like an ice pick, tremendous force can be brought to bear on the point, not only when oriented downward, but when an enemy is behind or beside. Third, the grip technique allows capping (shown in the photo at left) where the thumb (and thus force) is brought to bear on the butt of the knife handle, in this case at the rear bolster. This also increases the security of the knife grip. A fourth advantage of this grip technique is that the knife can be oriented with cutting edge to enemy even when guarding with the forearm. Many of my military clients prefer this grip technique built into their handles. A fifth advantage is that the "elbows bent" position that is usually assumed with this type of grip technique can be more powerful and defensive than an extended and reaching forearm, which is unprotected and may be easily trapped and fractured.
One of the disadvantages of this grip technique is limited reach. Because the point and edge can not be extended like a forward grip technique, the enemy must be handled at a closer range. A second issue is that deep thrusting moves can usually only be made downward or sideways, not frontally, unless the knife user is on top of his enemy. A third issue is one of trapping; that since the knife is closer to the body, the knife and arm can be pinned with a foot, object, or enemy's hand. Of course, the object pinning the knife is subject to serious damage from the knife, and certainly a bare hand will not be able to maintain pinning without being cut.
The knife shown here is my Macha Navigator combat knife pattern in bead blasted 440C high chromium stainless steel, with stainless steel bolsters and Micarta phenolic handle.
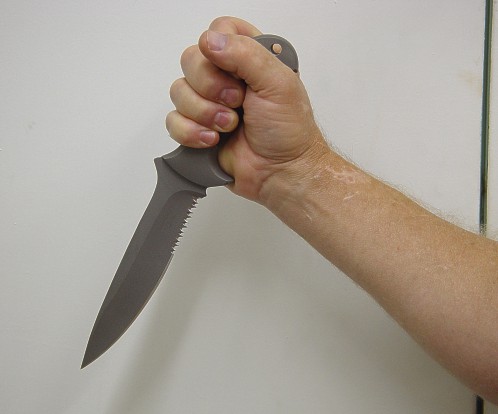
A knife is considered held in reverse grip when the point opposes the thumb. This variation of the reverse grip technique is called Edge In, because the cutting edge faces the knife user. As you can see in the photograph at the left, this particular knife does not comfortably accommodate this grip technique, as the quillons can dig into the palm of the hand, and the handle that is designed for finger security is too narrow to allow the entrance of the palm between the quillons. The individual knife handle shape is a huge factor in determining how a knife can be comfortably and securely held.
The advantages of this grip technique are similar to the advantages of the Reverse Grip Edge Out (RGEO) technique above, in that great force can be brought downward on the point of the knife blade. The movement is a clawing one, which some knife users are comfortable with. Enemies at the side and back can be vulnerable to this grip technique also.
The disadvantages are distinctly different. Having the cutting edge facing inward puts the movement of the knife blade toward the knife user. Cutting toward oneself with a 7" long bladed knife is never a good idea. The motion of thrusting is downward and inward, pulling the enemy closer into the knife user's body. If the knife user is trapped or a strike lands on the knife, it can be injurious to the knife owner.
This technique and style is widely promoted with the claim that the it is the only Reverse Grip technique that can be damaging, as the knife edge can cut as it's pulled in and down. This is only part of the picture. Knife slashes are less fatal than stabbing, piercing, or thrusting; the ancient Roman proved that. So if the CQC knife has a good, well-designed, aggressive point with a swage, deep piercing can occur no matter that the top spine has no cutting edge.
The human hand has amazing dexterity and can grip objects many ways. Over time, man has learned to adapt his tools to the hand, and the knife should be the epitome of these adaptations and designs, since it is man's first and original tool. Sadly, many knives that are manufactured or poorly made are designed for economic manufacturing limitations, not for accommodating the human hand.
Some of the many knife handle grip techniques are unusual, rarely seen, or specifically applied to a dedicated knife handle design. Features like finger rings, talons, spikes, and unusual shapes can guide the hand and create a very secure grip. Grip styles meant to amplify some specific function of the knife blade (like piercing) can lead to unusual grip positions. Below I've included some of these mentioned, and some that apply to my own knife styles. Since knife design is a fluid process, I'll adapt, upgrade, and add to this page as time allows.
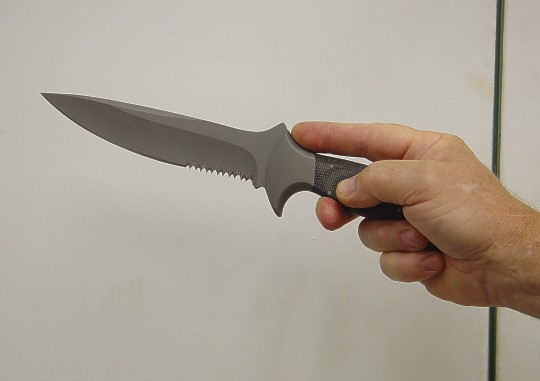
The Palm Reinforced knife handle grip technique relies on the heavy and thick base of the palm on the knife user's hand to apply pressure to the knife butt for piercing. The knife is aimed at the enemy, and the point shoved forward like a nail driver. With a punching motion, great piercing force can be applied to the knife blade point.
Though it may have some application, this technique has some severe limitations. The grip on the knife is tenuous at best. You can see in the photo that the knife is being secured only by the fingertips and tip of the thumb. the knife is extended greatly from the hand, reducing contact area of the hand to the handle. The butt of the knife must be well-formed and rounded, or it can injure the palm of the hand. The knife could be easily rotated in this grip technique, toward the knife user, or easily knocked out of the hand completely.
A much better application of this grip technique would be the push or palm dagger handle, which is T-shaped and designed with this grip technique in mind with the fingers folded around the handle spine.
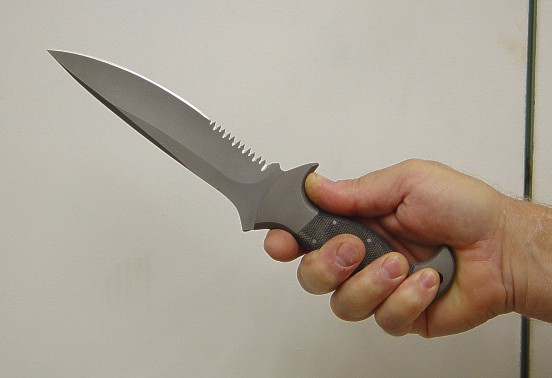
The Forward Grip Edge Up technique has the knife handle spine cradled in the fingers, with the thumb either on the quillon or wrapped around the knife handle. A hunter may often use this grip when skinning hanging game and cutting upward.
This grip technique has its advantage in upward thrusts. Cutting upward is the main reason for this technique, and typically, the handle shape of the knife plays a large role in whether this technique can be comfortably used. You can see in the photo that the rear quillon is digging into the palm of the hand and cutting upward would cause the knife to rotate more severely, and amplify this uncomfortable orientation. A distinct disadvantage is that if the knife is struck or parried, the impact could drive the blade's cutting edge into the face or neck of the knife user.
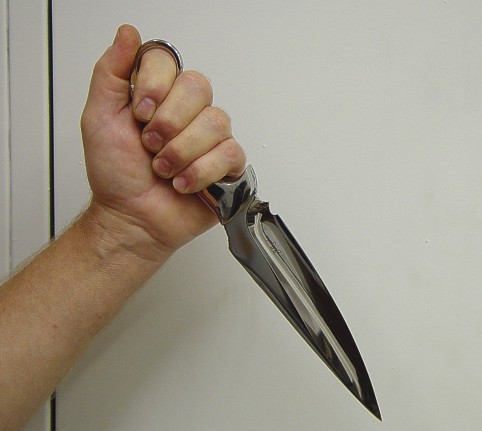
The Reverse Grip Edge Out knife grip technique is covered extensively above. In response to my military clients, and direct input from my own son who served in the 101st Airborne as a combat infantryman in several tours in OIF, I developed the rear finger ring. The handle design has been very popular with many military clients, including Marines and Special Operations as well as Infantry. Though the grip technique is the same as the RGEO above, the finger ring greatly increases the security and force delivery of this knife handle. The idea is that the knife is carried on the free-hand side, cutting edge forward. The forefinger is threaded through the ring as the knife is being pulled from the sheath. The remaining fingers are wrapped around the handle, and the handle shape accommodates the palm of the hand. The threading of the finger in the ring is fast and natural. This is a very positive knife-to-hand union, and creates a formidable piercing weapon for enemies at the side and back, and slashing weapon for enemies at the front, while freeing the dominant hand for firearm use. Below are a couple of pictures of this type of knife being unsheathed. The knife is my Bulldog pattern, named for the Bastion Bulldogs of the 101st Airborne.
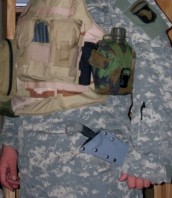
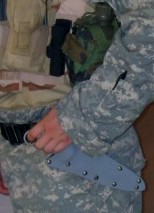
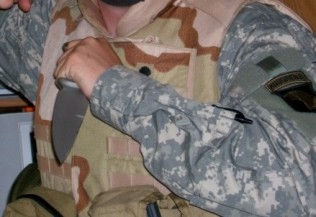
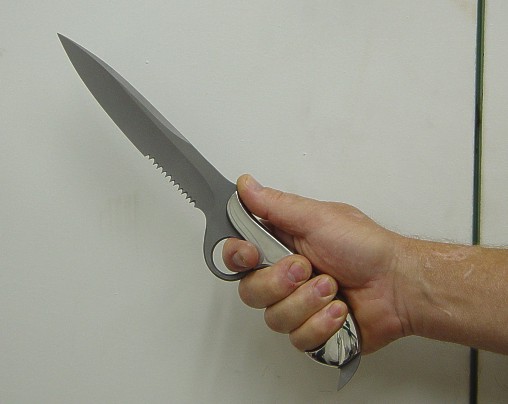
Another specialized grip style that is dependent on the knife handle shape is the Forward Grip, Saber, with a finger ring. This knife handle style was created in response to requests by my military clients fro improved security with a traditional forward grip style with a saber grip option. The knife is my Azophi pattern, made in tactical style. You can see how the finger ring accommodates the forefinger and is mounted to the heavy, thick part of the knife tang, just behind the ricasso. The large and thick front bolster set serves to strengthen the blade-to-handle area, and serves as a wide ramp for the thumb to rest in a saber grip technique. The handle is well-cut and formed to allow the fingers to wrap for a strong union. Note the heavy rear bolster set and the Talon, discussed below.
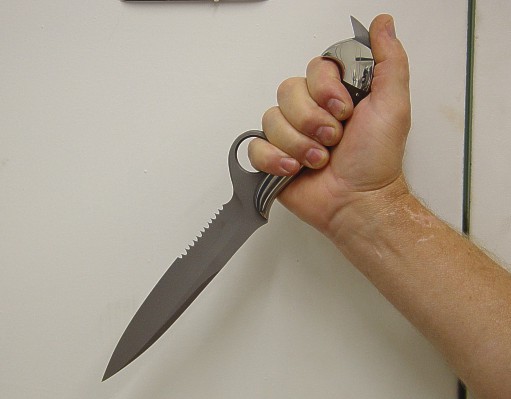
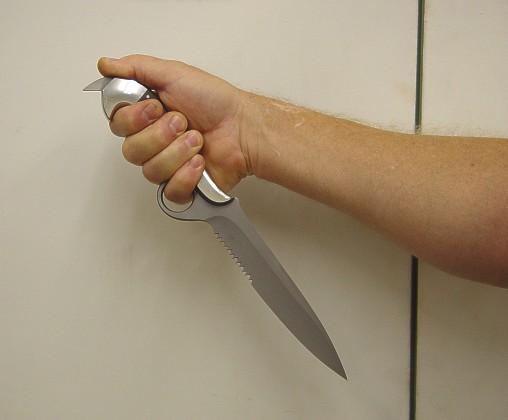
This is a Reverse Grip, Edge Out (RGEO) with finger ring security and a rear talon mounted on the knife. The knife is my "Azophi" pattern tactical combat knife discussed above. The handle is well-formed and in this grip technique, the thumb is laid over the rear bolster and guides the talon. Also called a skull crusher, or cat scratcher, the talon is used to guide an enemy along without fatal injury. Even though the talon is small, it can do a lot of damage. The talon (or skull crusher) should not be used or mounted to anything but a full tang knife, but is often seen on weaker pommels of hidden tang knives because it's easy to construct. The full tang is a solid piece of steel from blade tip to butt, including the talon, and in this knife even the butt is reinforced with thick, multi-pinned stainless steel bolsters so you can see how much stronger it is.
The limitations to this design center around the talon. The talon can injure the knife owner if he is not comfortable and experienced with its use. On my knife anatomy page, I describe how this is also called a cat scratcher because of the scratches to the forearm a knife user gets after practicing and handling the talon-equipped blade.
Limitations aside, many of my military and tactical knife clients are requesting this feature on their knives. I've had several reports of attacks that could have been fatal to enemies redirected to surrender or flight due to the use of the talon. Another neat function is that the talon can often be used while the knife is sheathed. I've had some clients with locking sheaths insist on this arrangement.
In the top photo, the blade is leading, a typical Reverse Grip, Edge Out position.
In the bottom photo, the talon is leading. Note the orientation of the blade. This is clearly a knife for the professional, as the blade and point must be kept away from the knife user's body. The straighter the angle of the talon point, the more the knife blade point will have to be aimed toward the body. This can be a problem on larger knives because a blow to the butt of the knife by the enemy can drive the blade into the knife user. Another option is how the knife with talon is held, and some choose to hold the knife with talon in the forward (hammer) grip style, aiming the talon in a downward direction.
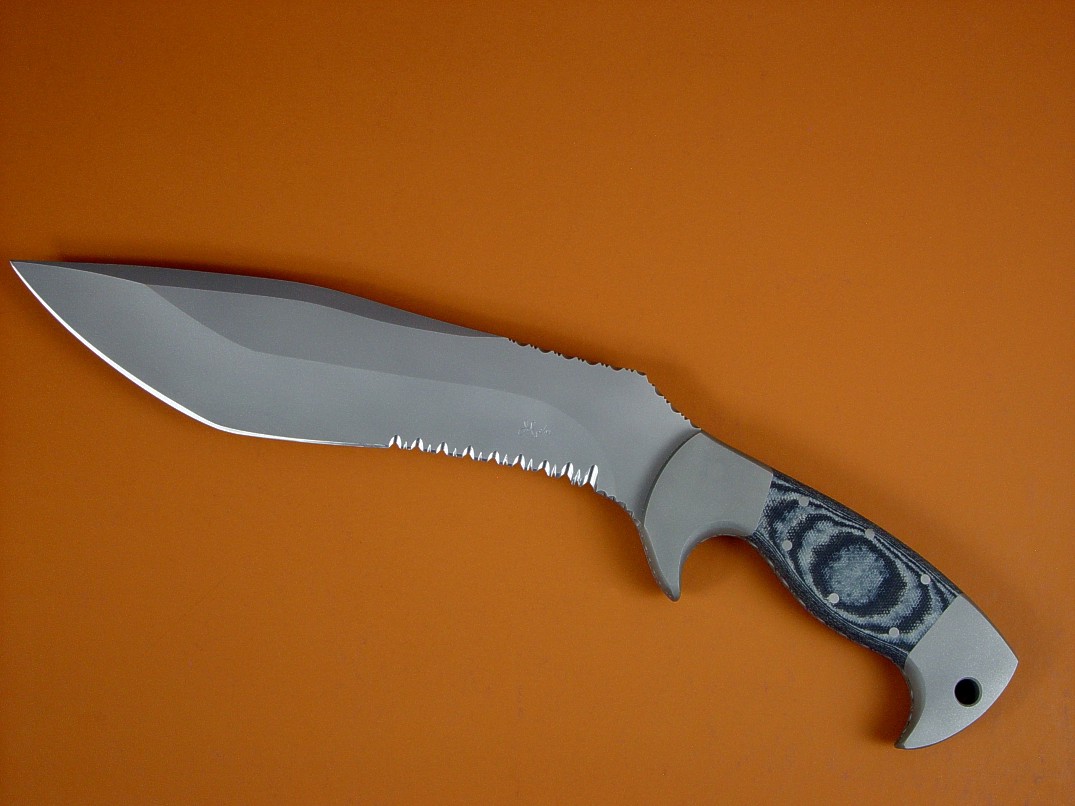
Someone once asked an old knifemaker friend of mine if he knew how to use the knives he was making. He replied, "Son, a man shouldn't make what he doesn't know how to use."
I could picture the old guy with one of his knives in his hand, whittling down his enemy...
Every now and then I get asked about what I prefer. I've handled knives a lot, been injured by quite a few. Of course, most of the injuries were my own fault, as most people can claim. But when it comes down to my life or someone else's, it's really simple, and I follow the following theory of conflict:
"I thoroughly disapprove of duels. If a man should challenge me, I would take him kindly and forgivingly by the hand and lead him to a quiet place and kill him."
--Mark Twain
There is no such thing as a clean fight. If someone wants your life, use any means necessary to protect it. Thank God almighty we live in a country that has protected our right to bear arms as one of its basic tenets. Thankfully, I'm well armed.
For my military and professional clients reading this, you probably already know what style and technique you prefer, and have your own ideas about the type of knife you would like to carry into battle or in your civilian duties. The most important thing is to get professional instruction. Drop me an email and we'll talk about the knife design that's best for you!
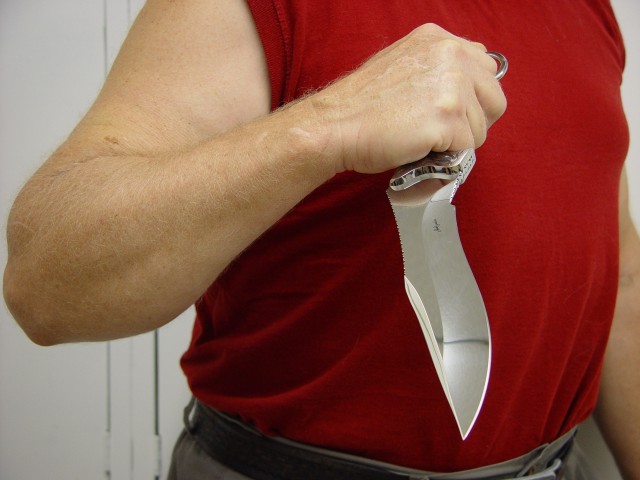
Hands can be very adaptive, conforming to many positions, grip techniques and styles, and can accommodate a wide variety of handles. Some handle shapes and some knife use scenarios, however, require a good fit to the individual hand. Handle designs with large quillons are the main types, but other handles can also be sized comfortably to the individual hand if needed.
I designed a simple hand-fitting method to measure the knife user's hand, and translate that size to the custom knife made for him. My own hand is rather large (I wear a size 13 wedding ring) so my own hand is not the norm for most men. Knife handles that need sizing are typically combat or tactical knives when deep front and rear quillions are used, and the fingers must rest between them. When I apply a measurement a knife client submits, I'll do my best to work with the hand size he submits. Not all knives can be balanced, designed, and arranged for every hand, so some discretion will be applied to each project based on my own experience. If your knife design does not have the quillon shapes as shown below, no problem, I'll make the adjustments to the individual handle for you, whether it has finger rings, talons, or other features.
Here's how to measure your hand for a custom knife:
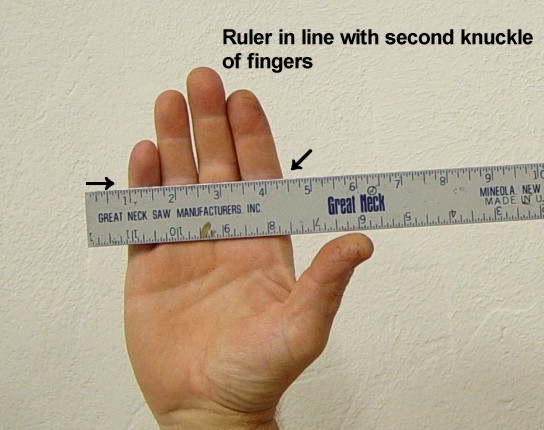
Lay a straight ruler across the inside of your hand, aligning the edge with the inside of the second knuckles of your fingers.
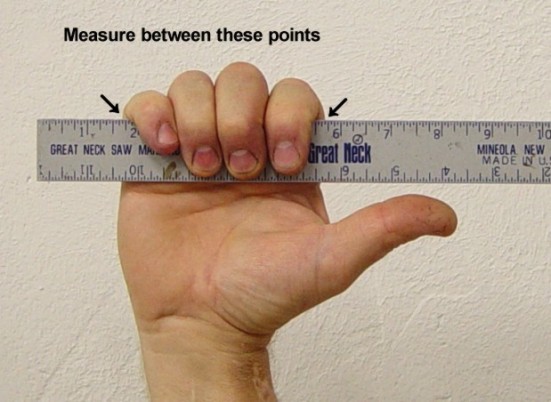
Fold the hand over the ruler and measure the distance between the knuckles. Be sure and measure between the knuckles. That is, subtract the lesser measure from the greater measure to get the difference.
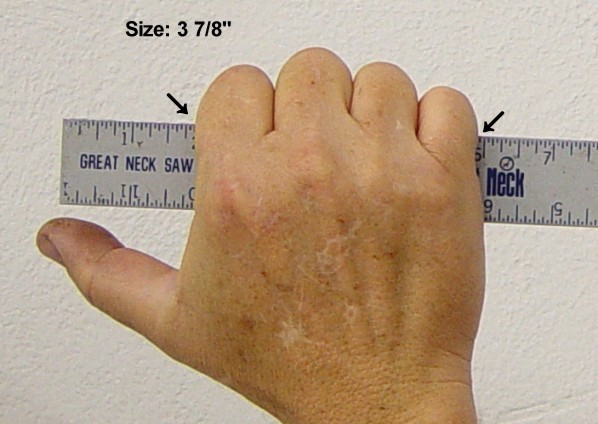
In this photo, I subtracted 2" from 5 7/8" for the measurement. Here, you can see from the measurement that my hand is 3 7/8" (3.875") between the folded knuckles. That is the dimension I need to calculate the distance between the quillons for a custom fit.
You'll want to be sure and let me know if you have some special condition of your hand, or if you wear large or bulky gloves, rings, or other factors that I will need to know to adjust the fit.
Below are some illustrations of a good fit, and a bad fit of knives to the individual hand.
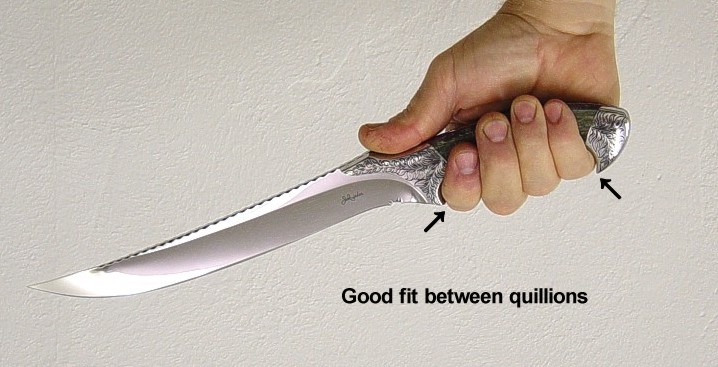
I size the actual opening between the quillons of the knife down about 1/8" for a good snug fit between the quillons. So the actual opening on this knife is 3 3/4"
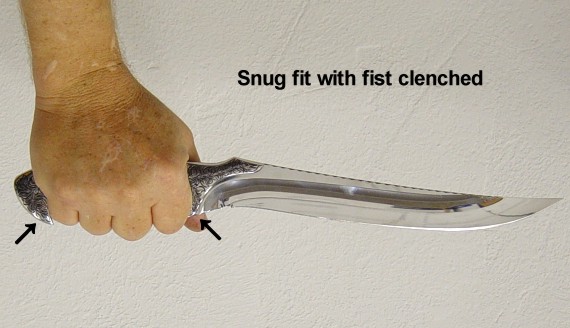
With a good custom fit, the fist is clenched and the hand tissue spreads a bit between the quillons, making the fit very solid and secure. Military clients should note that if you regularly wear gloves, either measure with the gloves on or add about 1/4" (.250) to the measurement between the quillons.
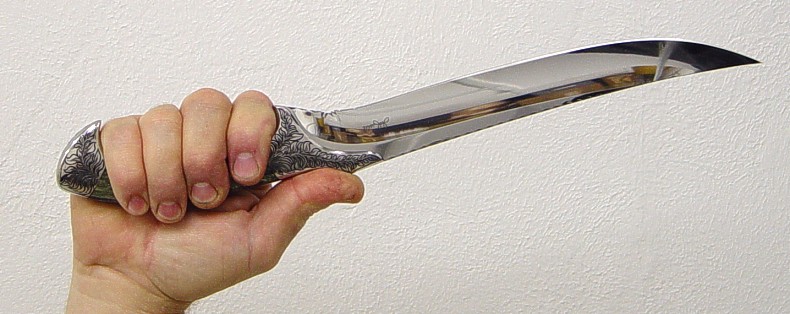
Here you can see the relationship between the fingers wrapped around the knife handle, and the handle drop at the butt settling into the palm. This is where a straight-handled knife becomes uncomfortable.
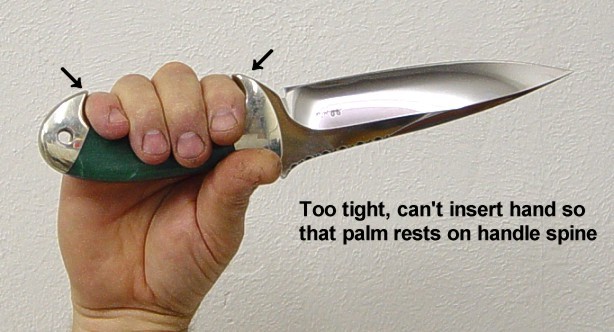
When the size of a knife is wrong, here is the result. This handle is suited to a smaller hand, so I can't fit my four fingers comfortably between the quillon tips and my palm can't even contact the handle.
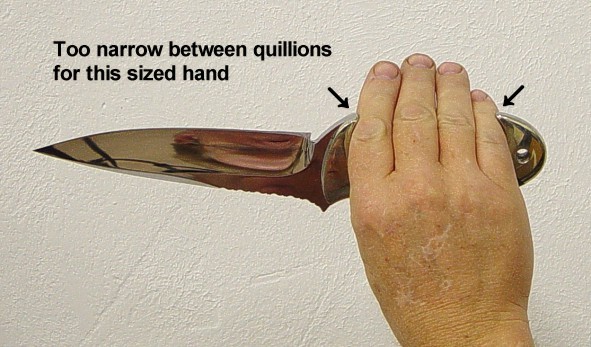
In many ways, a handle that is too small is worse than one that is too large. The hand simply can't fit.
When ordering or purchasing a knife on the internet, through a catalog, or from a brochure or media type that does not allow you to handle the knife in person, there is always the possibility that the knife may be uncomfortable or not suitable with your intended grip style. Some makers and outlets claim this is the sole reason that you should purchase a knife in public, such as at a store or at a knife show.
With the nature of this business nowadays, knife shows are becoming smaller and smaller venues, and even knife shops are struggling to stay open. This is due to the vast and worthwhile offerings on the internet, just like this very web site. There are several considerations that good makers and web sites employ to make sure you are happy with the knife grip, feel, security, and comfort.
| Main | Purchase | Tactical | Specific Types | Technical | More |
| Home Page | Where's My Knife, Jay? | Current Tactical Knives for Sale | The Awe of the Blade | Knife Patterns | My Photography |
| Website Overview | Current Knives for Sale | Tactical, Combat Knife Portal | Museum Pieces | Knife Pattern Alphabetic List | Photographic Services |
| My Mission | My Knife Prices | All Tactical, Combat Knives | Investment, Collector's Knives | Copyright and Knives | Photographic Images |
| The Finest Knives and You | How To Order | Counterterrorism Knives | Daggers | Knife Anatomy | |
| Featured Knives: Page One | Purchase Finished Knives | Professional, Military Commemoratives | Swords | Custom Knives | |
| Featured Knives: Page Two | Order Custom Knives | USAF Pararescue Knives | Folding Knives | Modern Knifemaking Technology | My Writing |
| Featured Knives: Page Three | Knife Sales Policy | USAF Pararescue "PJ- Light" | Chef's Knives | Factory vs. Handmade Knives | First Novel |
| Featured Knives: Older/Early | Bank Transfers | 27th Air Force Special Operations | Food Safety, Kitchen, Chef's Knives | Six Distinctions of Fine Knives | Second Novel |
| Email Jay Fisher | Custom Knife Design Fee | Khukris: Combat, Survival, Art | Hunting Knives | Knife Styles | Knife Book |
| Contact, Locate Jay Fisher | Delivery Times | Serrations | Working Knives | Jay's Internet Stats | |
| FAQs | My Shipping Method | Grip Styles, Hand Sizing | Khukris | The 3000th Term | Videos |
| Current, Recent Works, Events | Business of Knifemaking | Concealed Carry and Knives | Skeletonized Knives | Best Knife Information and Learning About Knives | |
| Client's News and Info | Military Knife Care | Serrations | Cities of the Knife | Links | |
| Who Is Jay Fisher? | The Best Combat Locking Sheath | Knife Sheaths | Knife Maker's Marks | ||
| Testimonials, Letters and Emails | Knife Stands and Cases | How to Care for Custom Knives | Site Table of Contents | ||
| Top 22 Reasons to Buy | Tactical Knife Sheath Accessories | Handles, Bolsters, Guards | Knife Making Instruction | ||
| My Knifemaking History | Loops, Plates, Straps | Knife Handles: Gemstone | Larger Monitors and Knife Photos | ||
| What I Do And Don't Do | Belt Loop Extenders-UBLX, EXBLX | Gemstone Alphabetic List | New Materials | ||
| CD ROM Archive | Independent Lamp Accessory-LIMA | Knife Handles: Woods | Knife Shop/Studio, Page 1 | ||
| Publications, Publicity | Universal Main Lamp Holder-HULA | Knife Handles: Horn, Bone, Ivory | Knife Shop/Studio, Page 2 | ||
| My Curriculum Vitae | Sternum Harness | Knife Handles: Manmade Materials | |||
| Funny Letters and Emails, Pg. 1 | Blades and Steels | Sharpeners, Lanyards | Knife Embellishment | ||
| Funny Letters and Emails, Pg. 2 | Blades | Bags, Cases, Duffles, Gear | |||
| Funny Letters and Emails, Pg. 3 | Knife Blade Testing | Modular Sheath Systems | |||
| Funny Letters and Emails, Pg. 4 | 440C: A Love/Hate Affair | PSD Principle Security Detail Sheaths | |||
| Funny Letters and Emails, Pg. 5 | ATS-34: Chrome/Moly Tough | ||||
| Funny Letters and Emails, Pg. 6 | D2: Wear Resistance King | ||||
| The Curious Case of the "Sandia" | O1: Oil Hardened Blued Beauty | ||||
| The Sword, the Veil, the Legend |
Elasticity, Stiffness, Stress, and Strain in Knife Blades |
||||
| Professional Knife Consultant |
Heat Treating and Cryogenic Processing of Knife Blade Steels |